

 Set up docs MCP
SAML SSO is available in the Enterprise plan. To upgrade, visit the plans page in the cloud console.
ClickHouse Cloud supports single-sign on (SSO) via security assertion markup language (SAML). This enables you to sign in securely to your ClickHouse Cloud organization by authenticating with your identity provider (IdP).
We support service provider-initiated SSO, multiple organizations using separate connections, and just-in-time provisioning. We also support SCIM provisioning with Okta and Microsoft Entra ID. We don’t yet support attribute mapping.
Customers enabling SAML integrations can also designate the default role that will be assigned to new users and adjust session timeout settings.
Before you begin
You will need Admin permissions in your IdP, the ability to add a TXT record to the DNS settings for your domain, the Admin role in your ClickHouse Cloud organization. We recommend setting up a direct link to your organization in addition to your SAML connection to simplify the login process. Each IdP handles this differently. Read on for how to do this for your IdP.
How it works
Once SAML SSO is configured, users sign in through a service-provider-initiated flow:
- The user goes to
https://console.clickhouse.cloudand enters their email address (or uses your organization’s direct link). - ClickHouse Cloud redirects them to your identity provider to authenticate.
- On success, the identity provider redirects them back to ClickHouse Cloud.
- ClickHouse Cloud signs them in, provisioning the account just-in-time on first login and assigning your configured default role.
The rest of this guide covers the one-time configuration.
How to configure your IdP
Access Organization settings
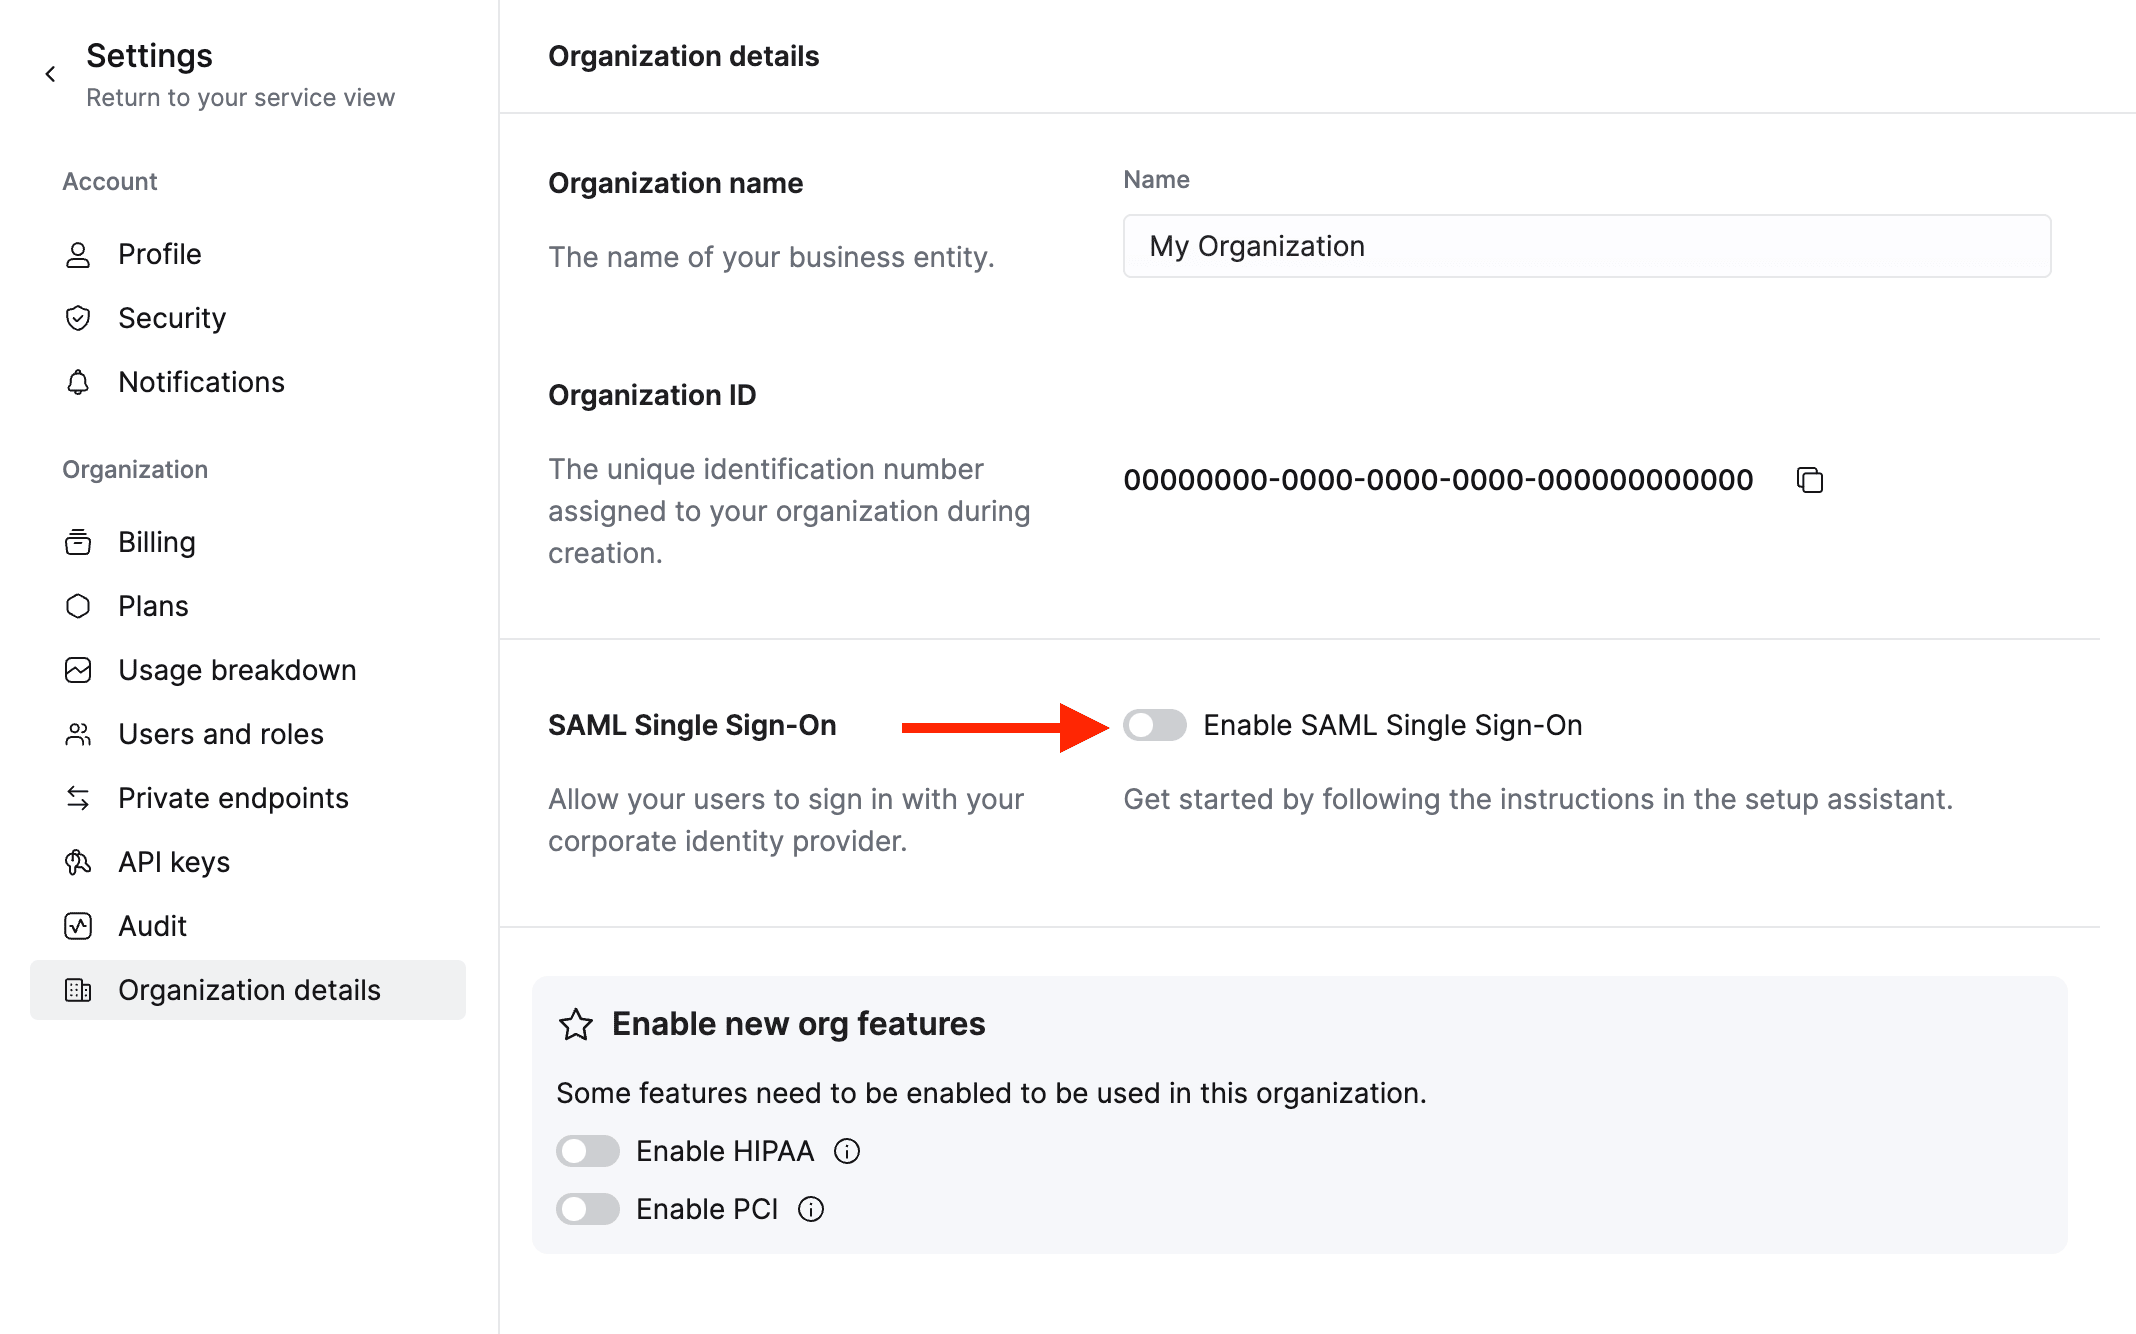
Click on your organization name in the lower left corner and select Organization details.
Enable SAML single sign-on
Click the toggle next to Enable SAML single sign-on. Leave this screen open as you will refer back to it several times during the setup process.
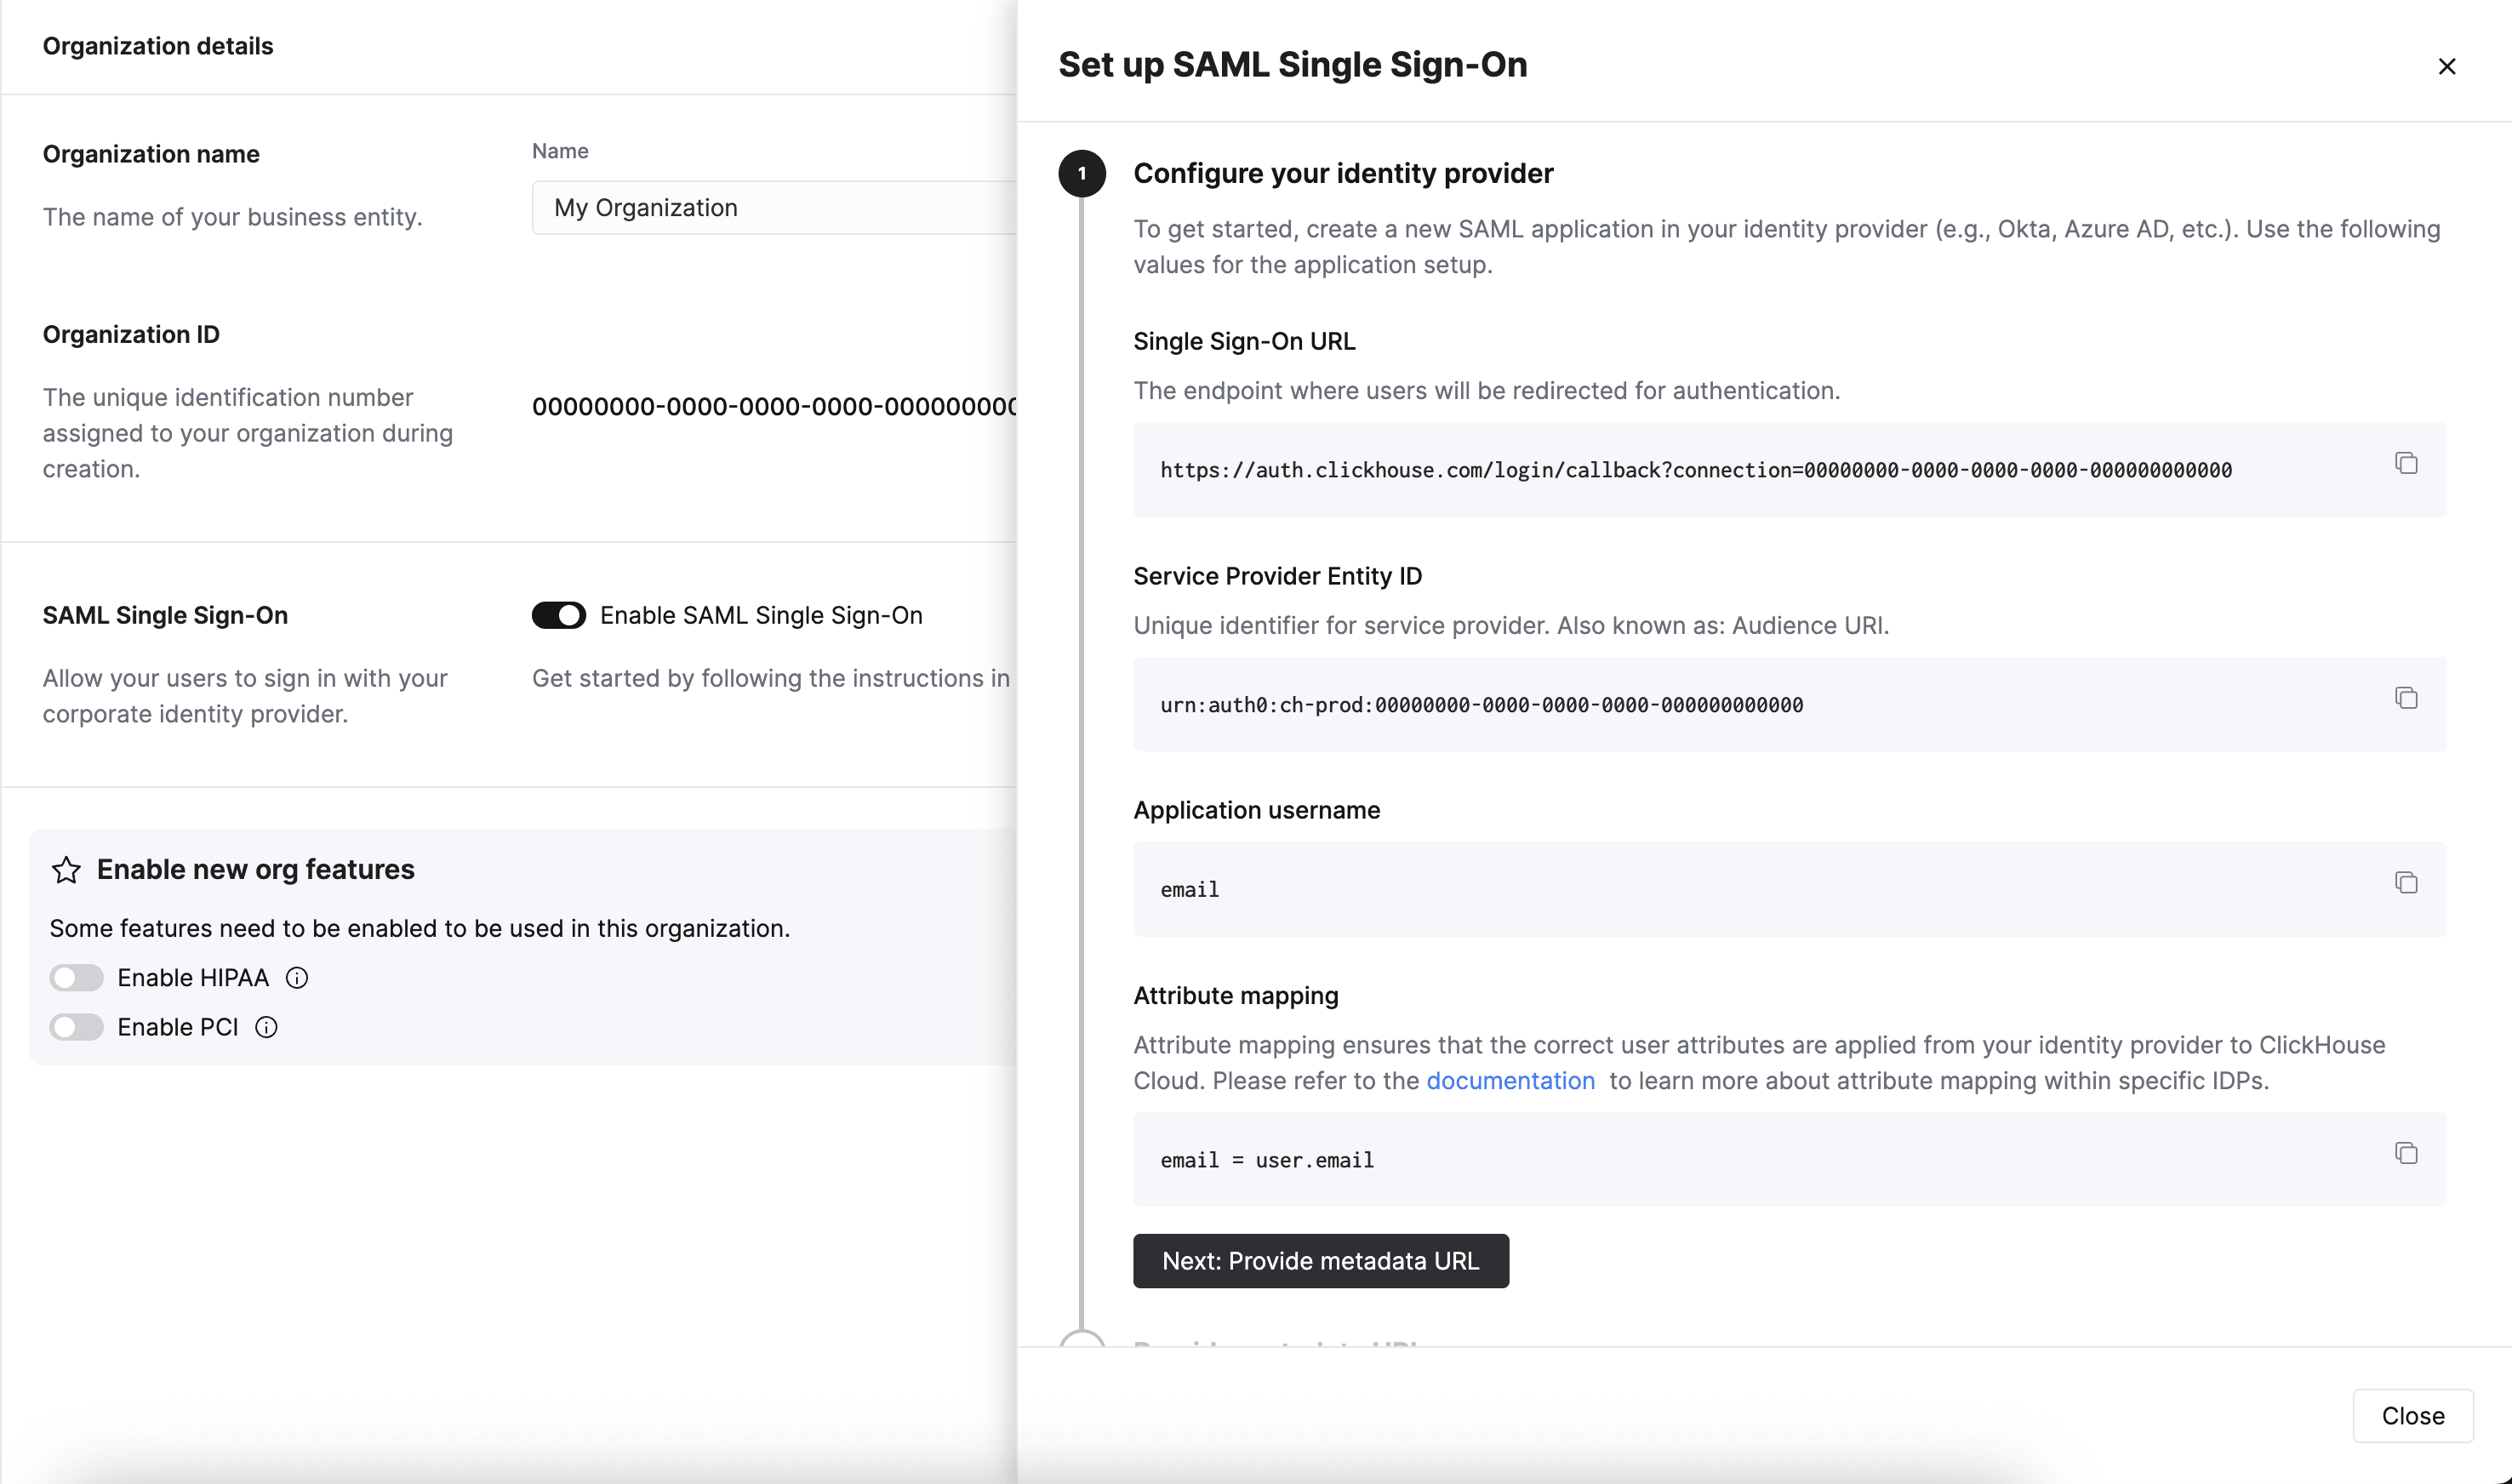
Create an application in your identity provider
Create an application within your identity provider and copy the values on the Enable SAML single sign-on screen to your identity provider configuration. For more information on this step, refer to your specific identity provider below.
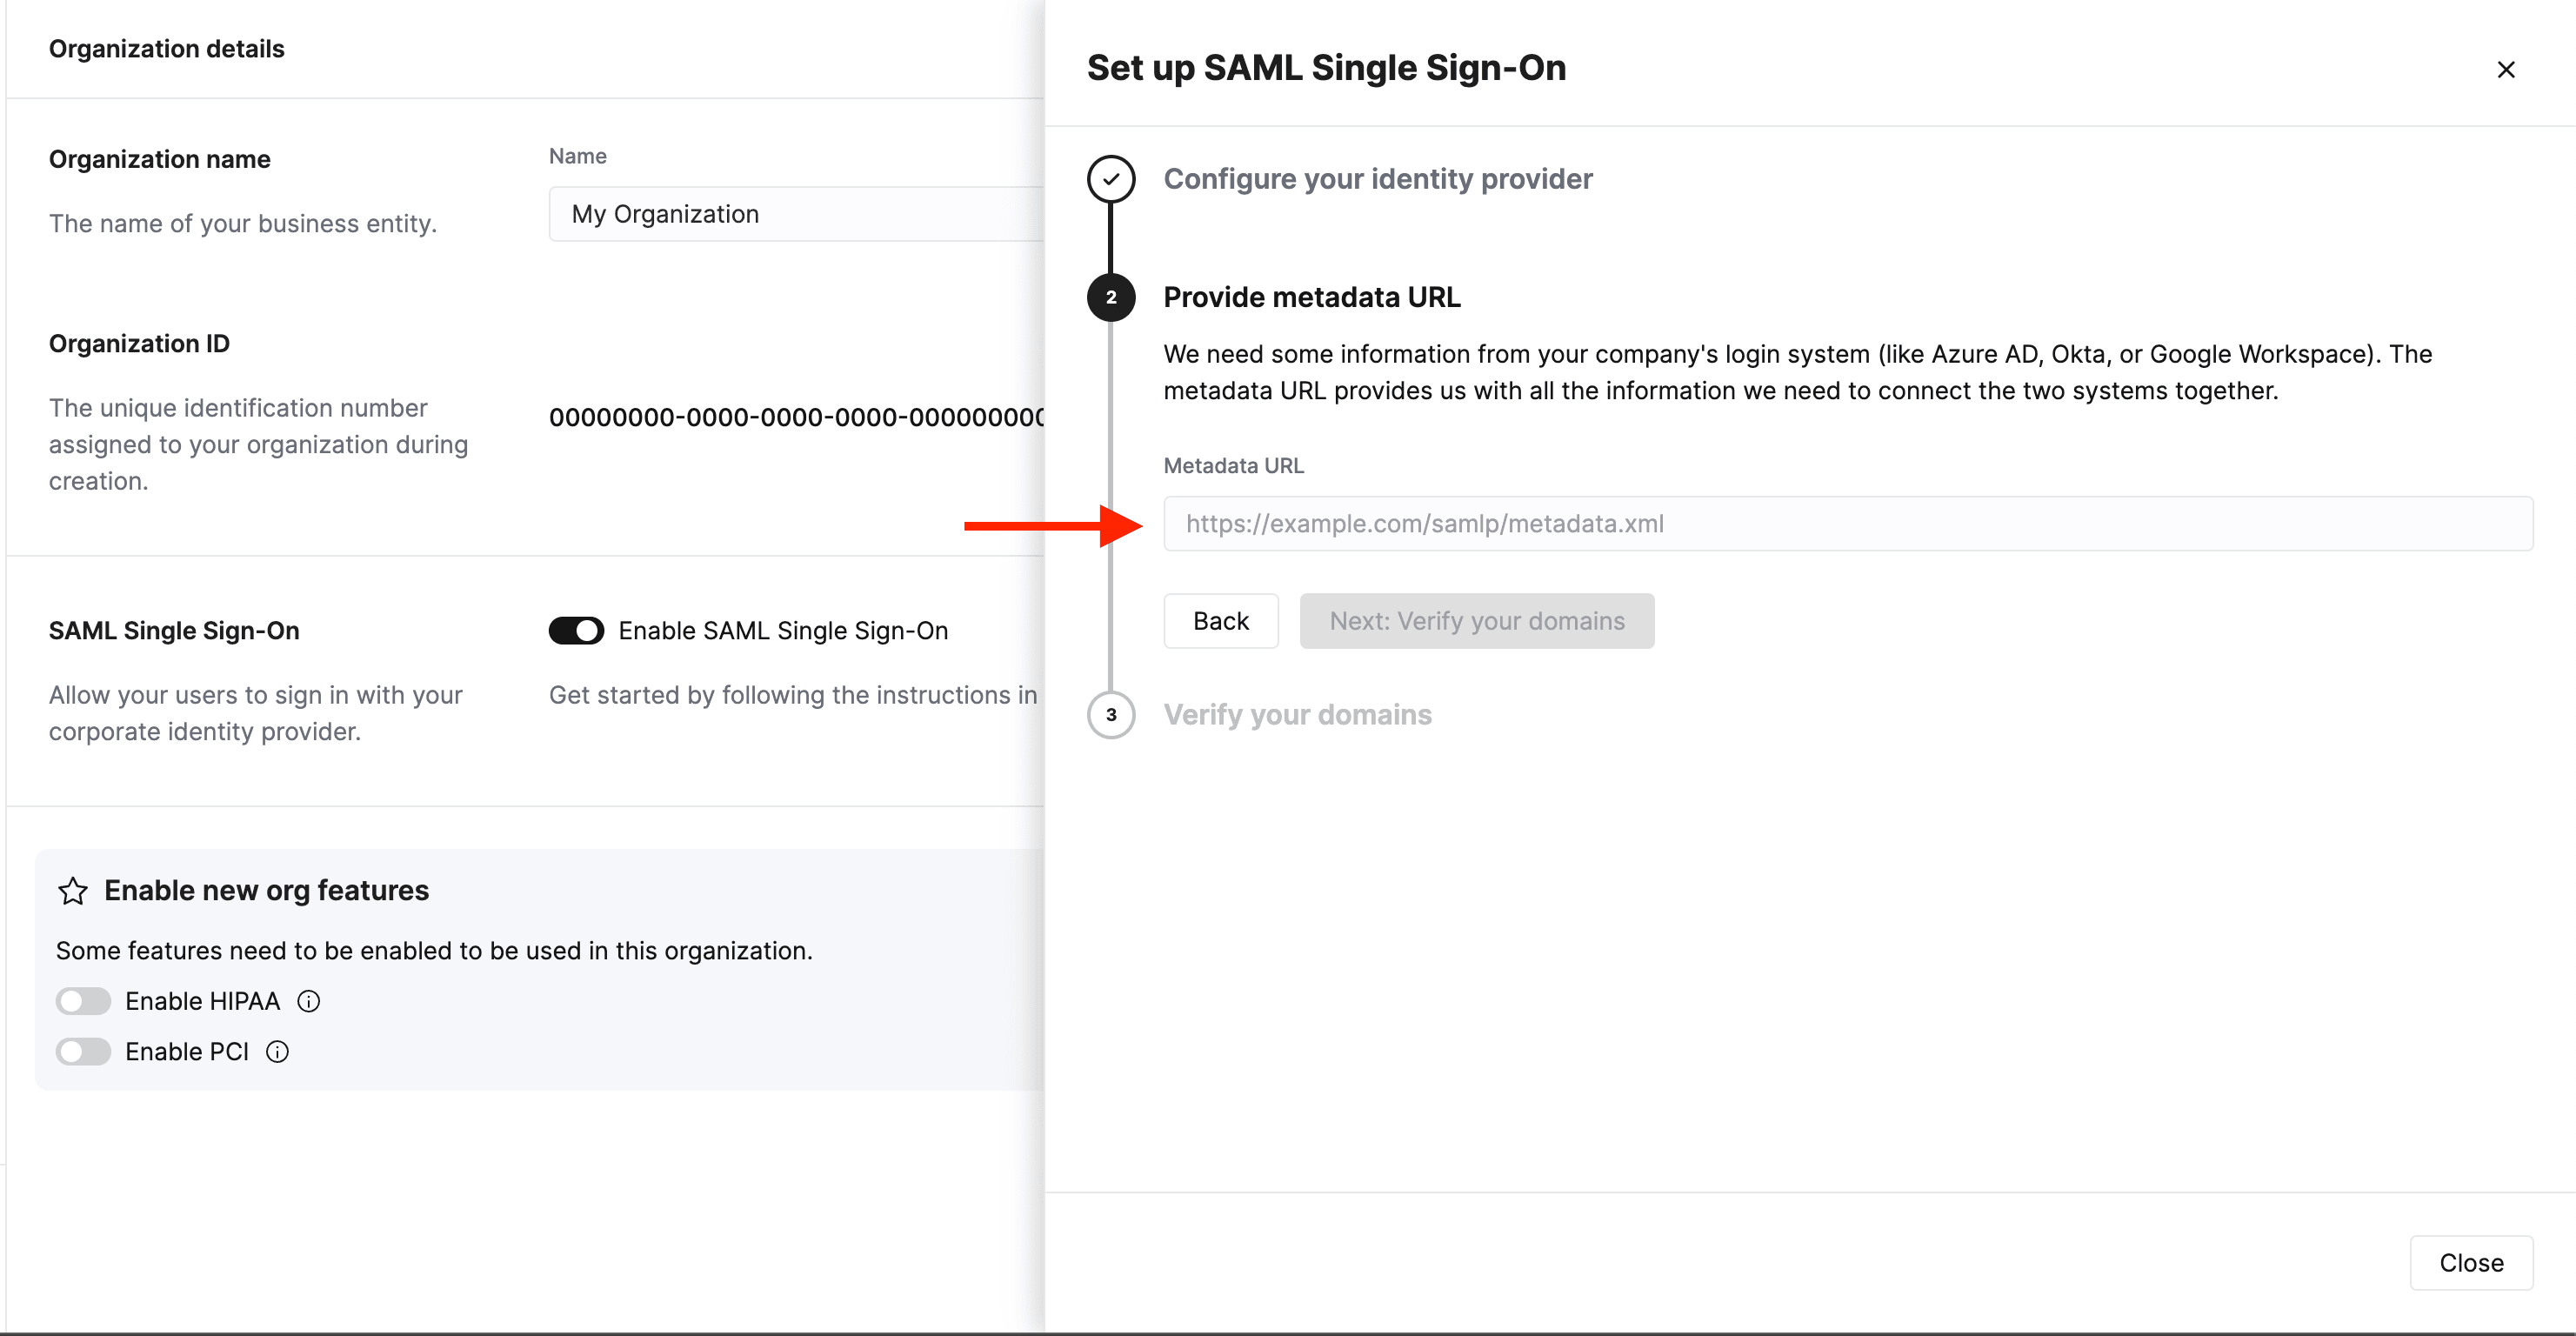
Add the metadata URL to your SAML configuration
Obtain the Metadata URL from your SAML provider. Return to ClickHouse Cloud, click Next: Provide metadata URL and paste the URL in the text box.
Get domain verification code
Click Next: Verify your domains. Enter your domain in the text box and click Check domain. The system will generate a random verification code for you to add to a TXT record with your DNS provider.
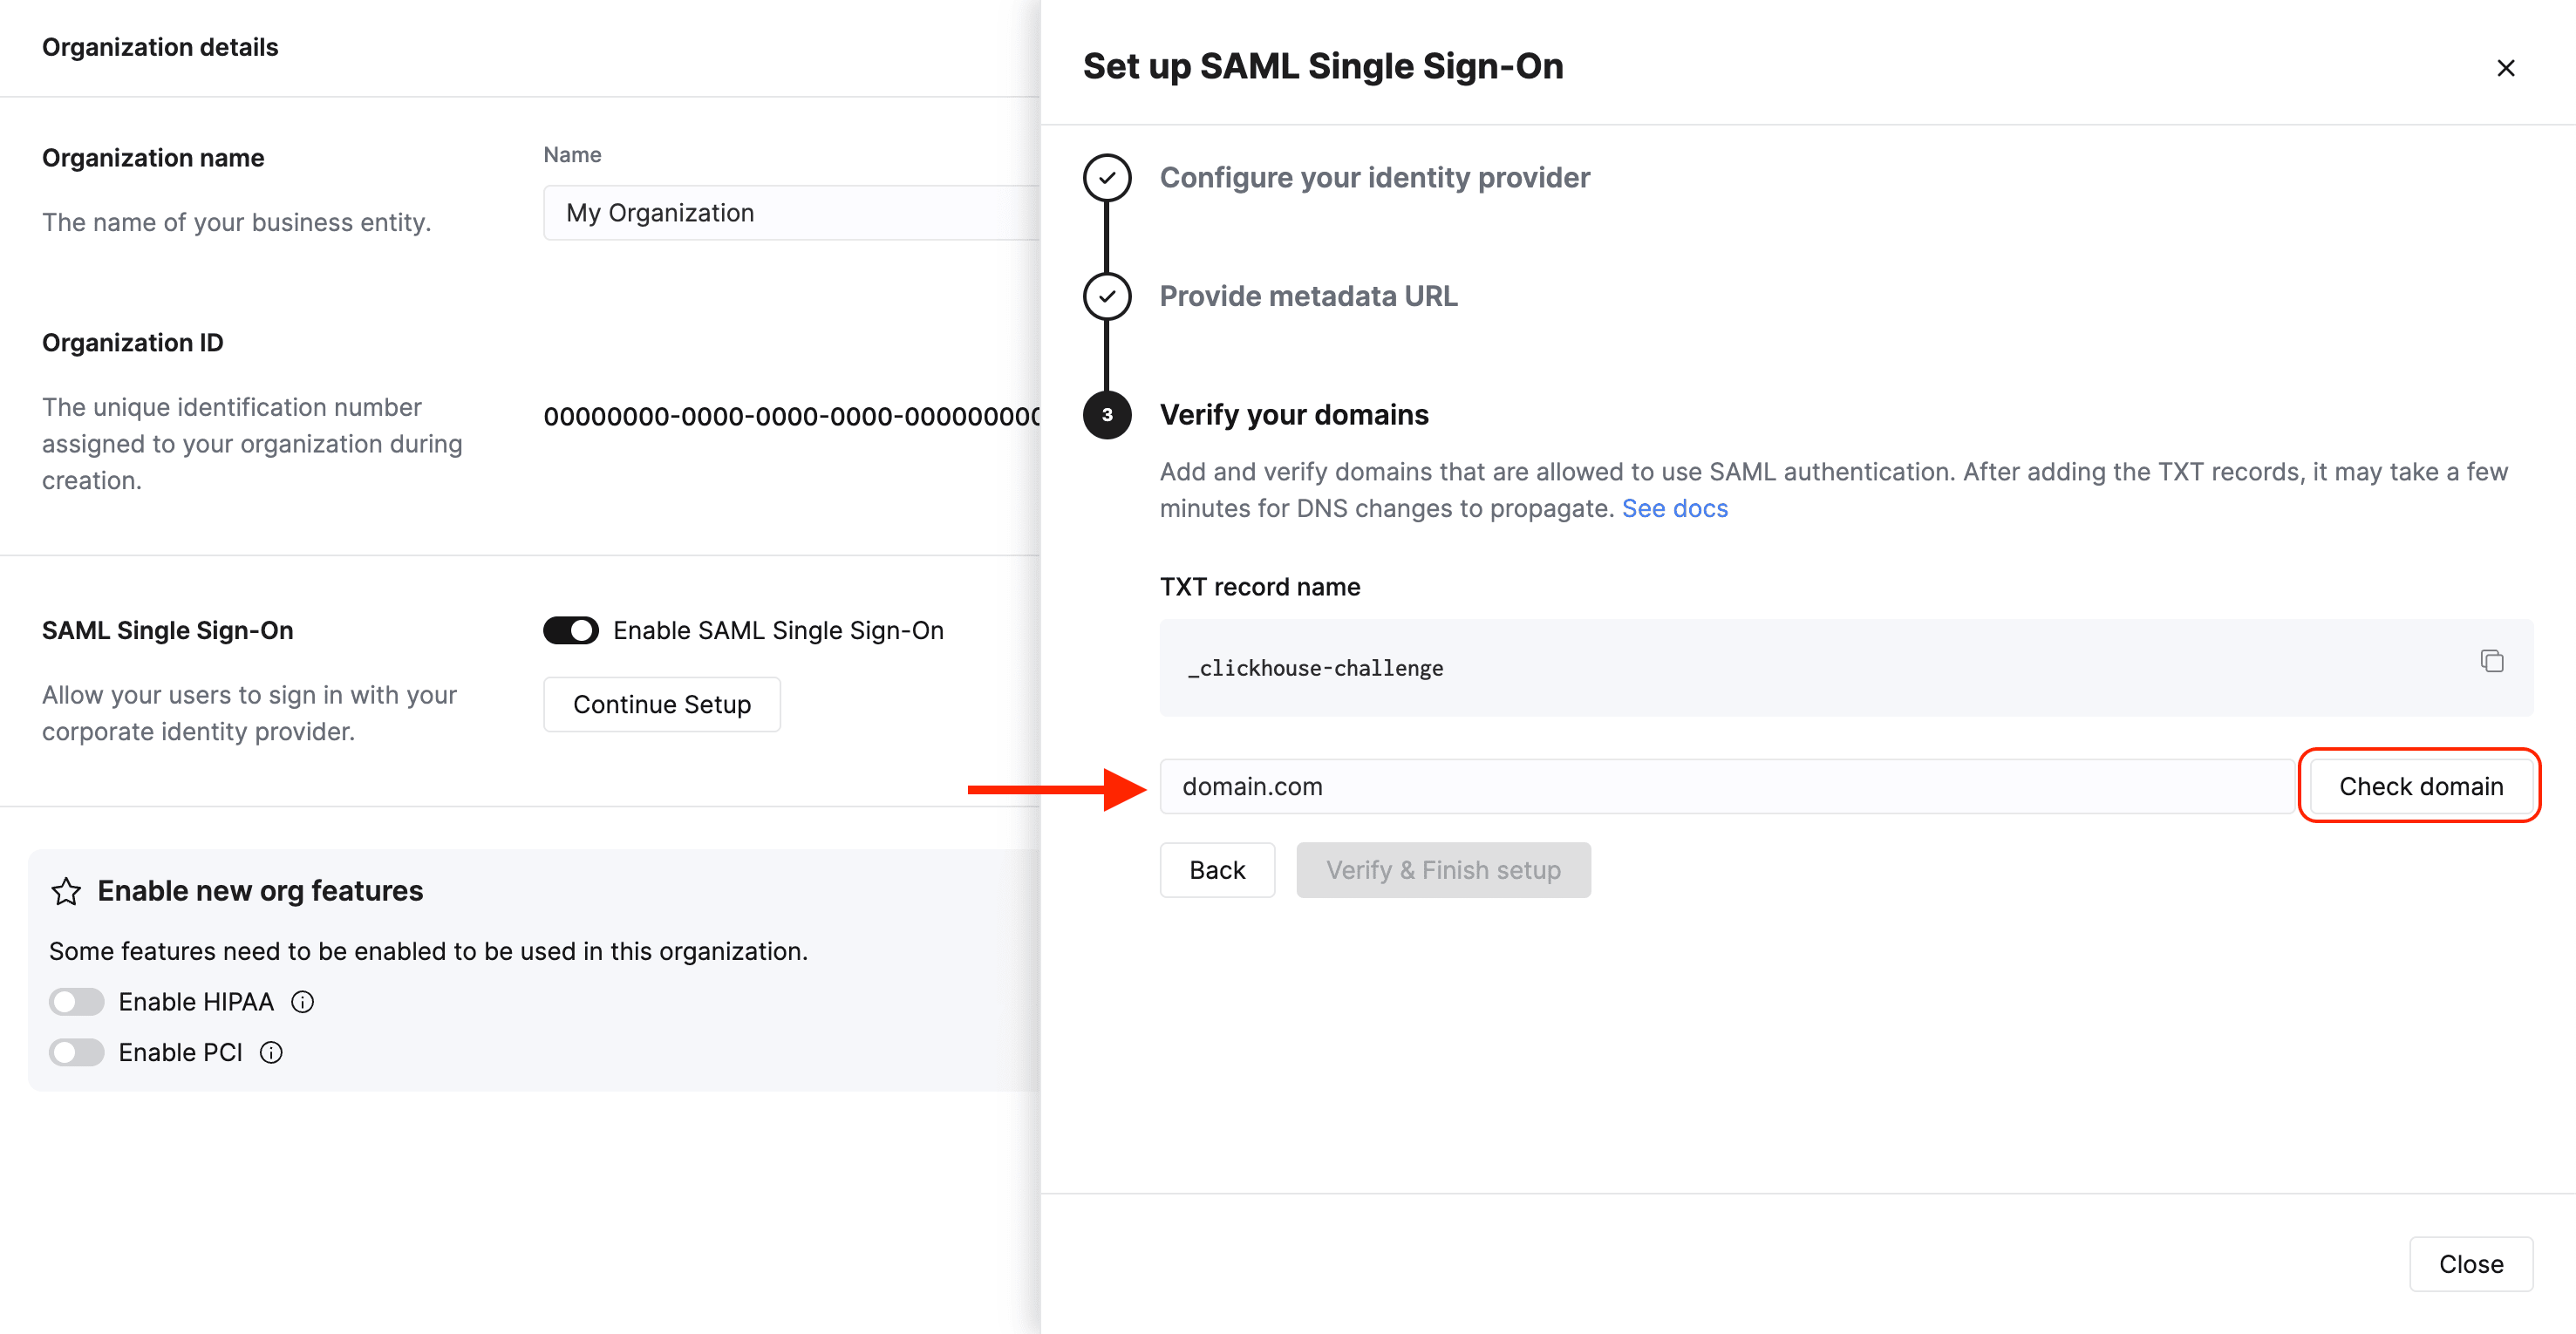
Verify your domain
Create a TXT record with your DNS provider. Copy the TXT record name to the TXT record Name field with your DNS provider. Copy the Value to the Content field with your DNS provider. Click Verify and Finish to complete the process.
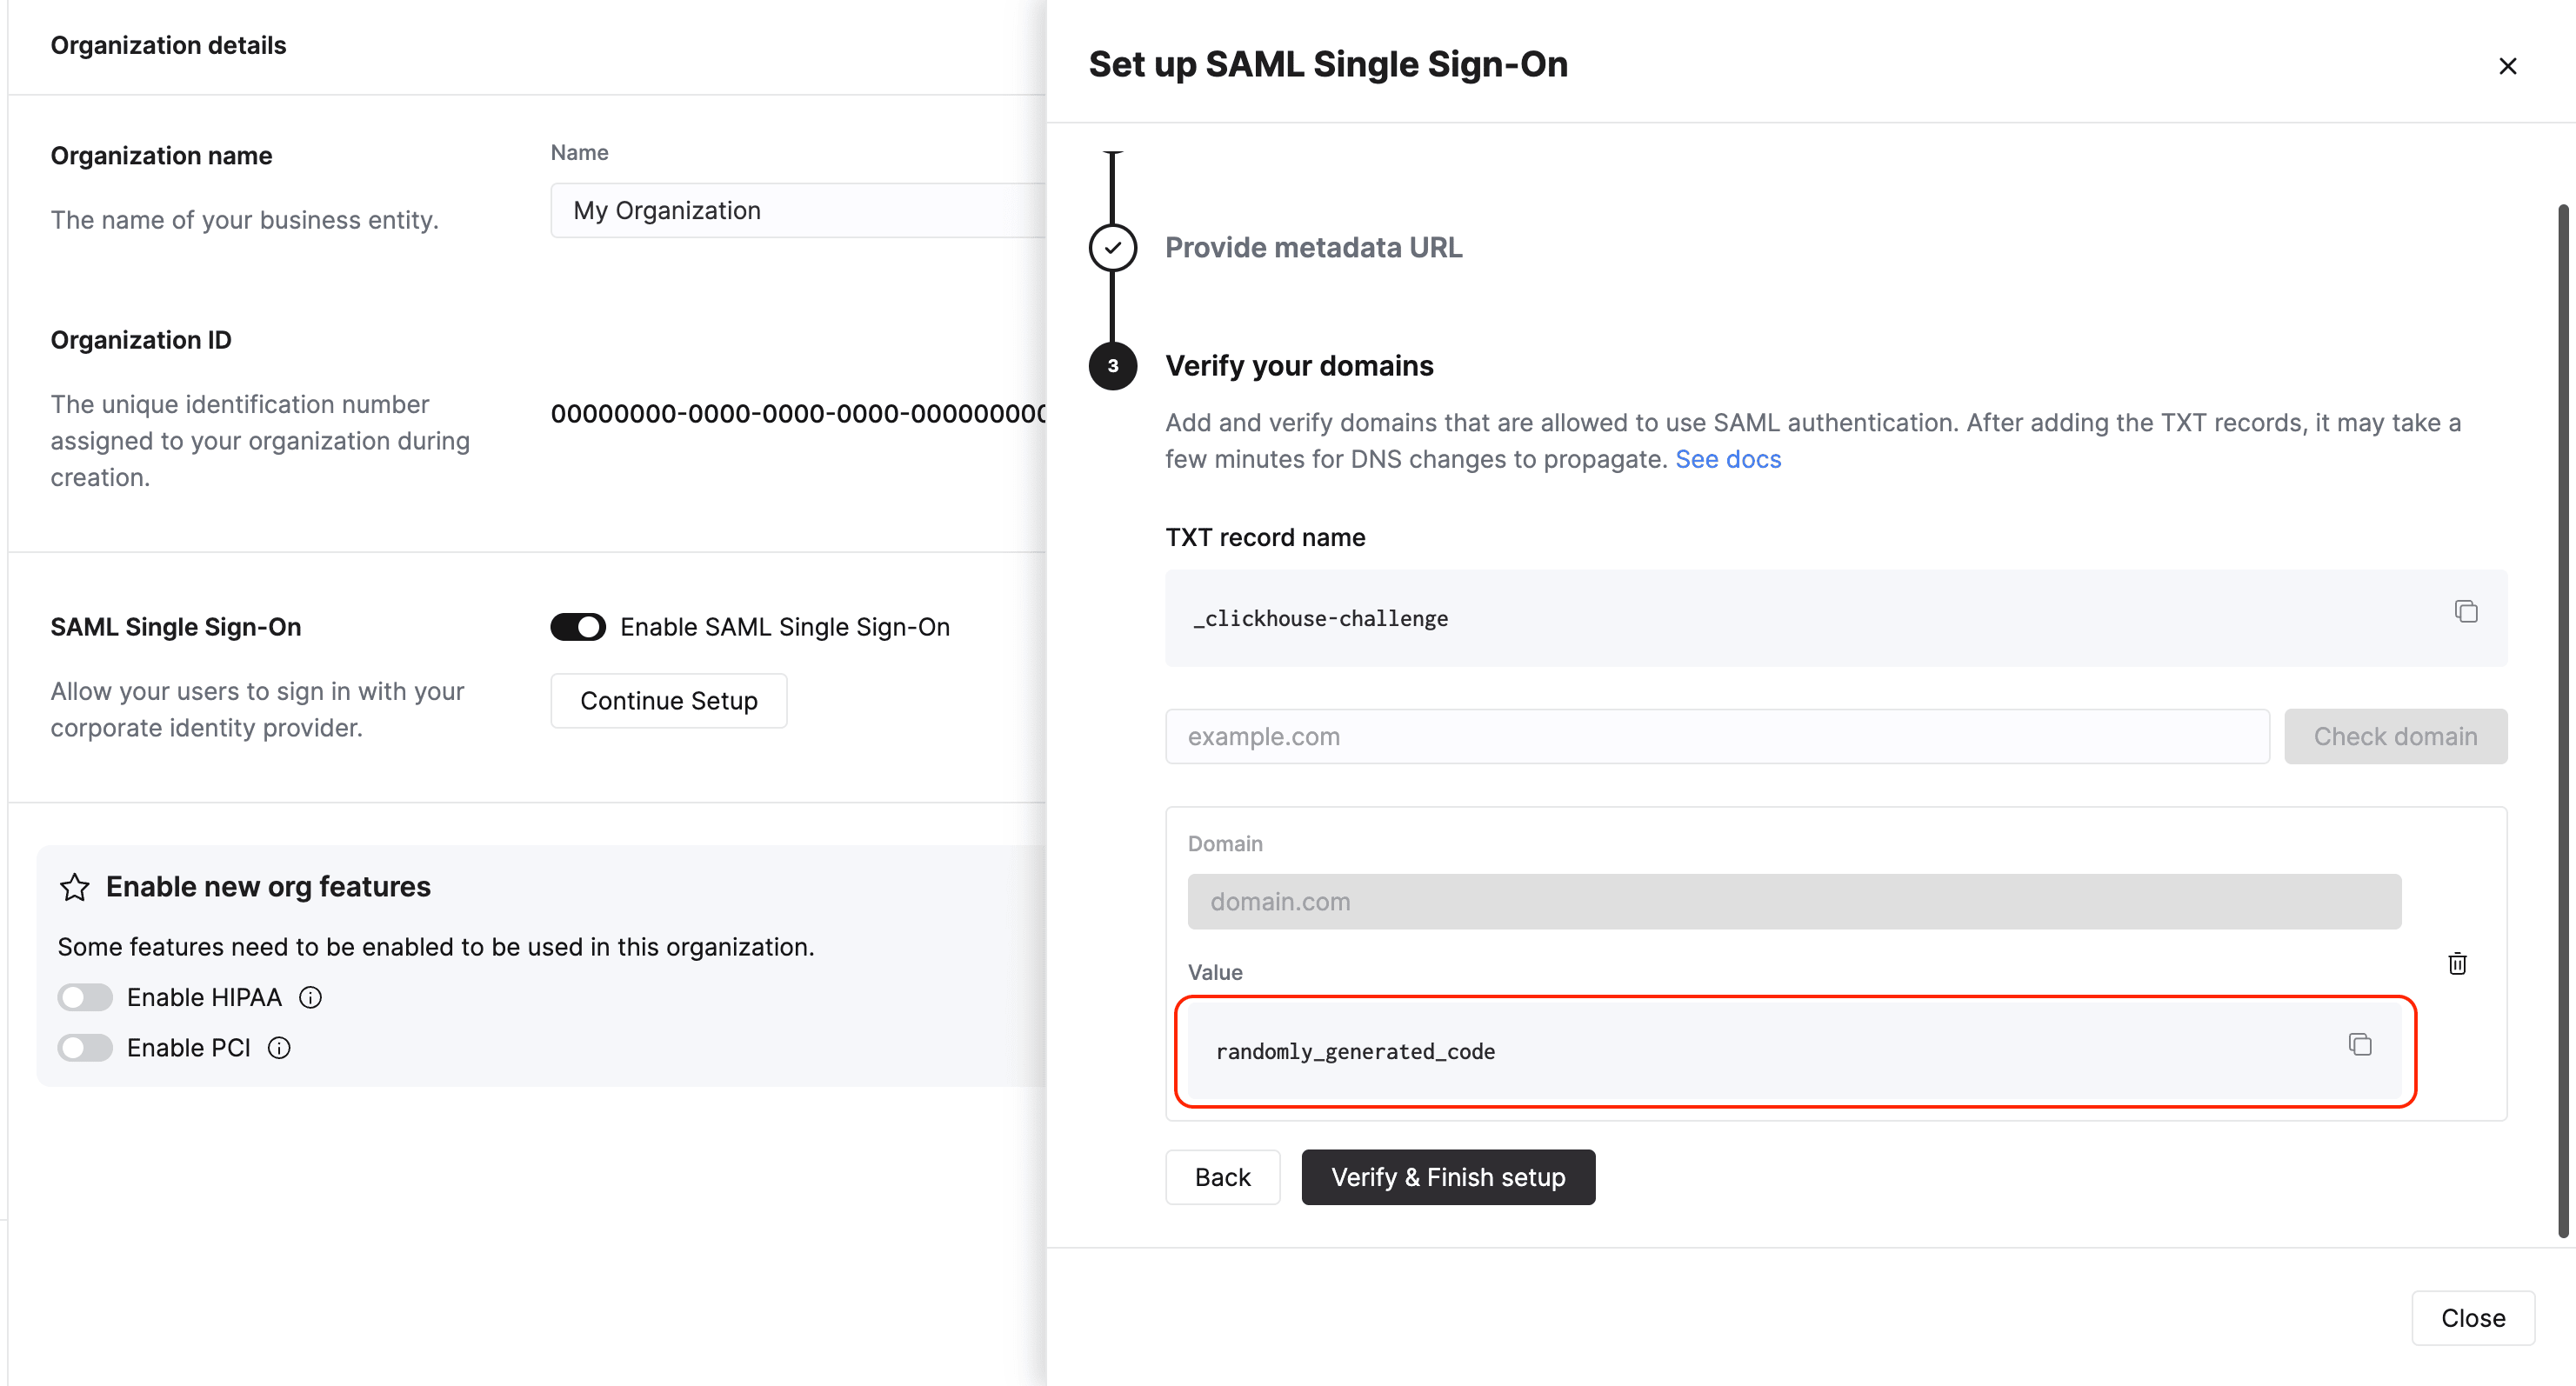
Update default role and session timeout
Once the SAML setup is complete, you can set the default role(s) all users will be assigned when they log in and also adjust session timeout settings. For a list of available system roles that may be assigned, please review Console roles and permissions.
Configure your admin user
To assign your first admin user via SAML:
- Log out of ClickHouse Cloud.
- In your identity provider, assign the admin user to the ClickHouse applications.
- Ask the user to log in via https://console.clickhouse.cloud/?connection={orgId} (shortcut URL). This may be via a bookmark you created in the prior steps. The user won’t appear in ClickHouse Cloud until their first login.
- If the default SAML role is anything other than Admin, the user may need to log out and log back in with their original authentication method to update the new SAML user’s role.
- For email + password accounts, please use
https://console.clickhouse.cloud/?with=email. - For social logins, please click the appropriate button (Continue with Google or Continue with Microsoft)
- For email + password accounts, please use
- Log out one more time and log back in via the shortcut URL to complete the last step below.
Remove other authentication methods
Remove any users that are using a non-SAML method to complete the integration and restrict access to only users originating from your identity provider connection.
Configure your identity provider
You will configure two App Integrations in Okta for each ClickHouse organization: one SAML app and one bookmark to house your direct link.
Create a group to manage access
- Log in to your Okta instance as an Administrator.
- Select Groups on the left.
- Click Add group.
- Enter a name and description for the group. This group will be used to keep users consistent between the SAML app and its related bookmark app.
- Click Save.
- Click the name of the group that you created.
- Click Assign people to assign users you would like to have access to this ClickHouse organization.
Create a bookmark app to enable users to seamlessly log in
- Select Applications on the left, then select the Applications subheading.
- Click Browse App Catalog.
- Search for and select Bookmark App.
- Click Add integration.
- Select a label for the app.
- Enter the URL as
https://console.clickhouse.cloud/?connection={organizationid} - Go to the Assignments tab and add the group you created above.
Create a SAML app to enable the connection
-
Select Applications on the left, then select the Applications subheading.
-
Click Create App Integration.
-
Select SAML 2.0 and click Next.
-
Enter a name for your application and check the box next to Don’t display application icon to users then click Next.
-
Use the following values to populate the SAML settings screen.
Field Value Single Sign On URL Copy the Single Sign-On URL from the console Audience URI (SP Entity ID) Copy the Service Provider Entity ID from the console Default RelayState Leave blank Name ID format Unspecified Application username Email Update application username on Create and update -
Enter the following Attribute Statement.
Name Name format Value email Basic user.email -
Click Next.
-
Enter the requested information on the Feedback screen and click Finish.
-
Go to the Assignments tab and add the group you created above.
-
On the Sign On tab for your new app, click the Copy metadata URL button.
-
Return to Add the metadata URL to your SAML configuration to continue the process.
You will configure one SAML app in Google for each organization and must provide your users the direct link (https://console.clickhouse.cloud/?connection={organizationId}) to bookmark if using multi-org SSO.
Create a Google web app
-
Go to your Google Admin console (admin.google.com).
-
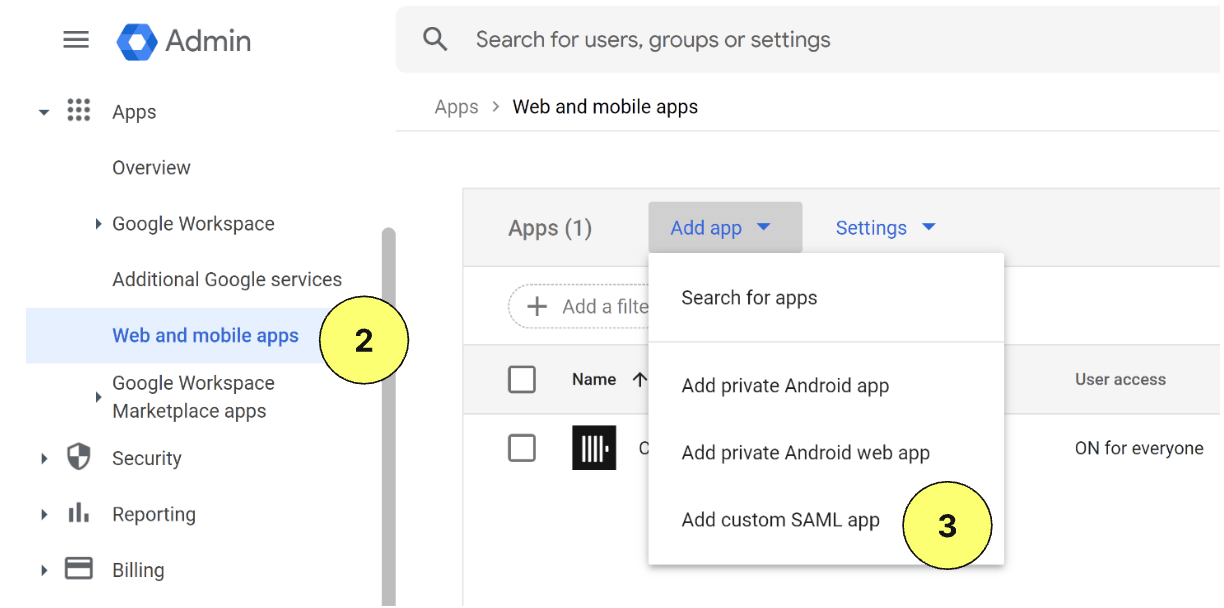
Click Apps, then Web and mobile apps on the left.
-
Click Add app from the top menu, then select Add custom SAML app.
-
Enter a name for the app and click Continue.
-
Copy the metadata URL and save it somewhere.
-
Enter the ACS URL and Entity ID below.
Field Value ACS URL Copy the Single Sign-On URL from the console Entity ID Copy the Service Provider Entity ID from the console -
Check the box for Signed response.
-
Select EMAIL for the Name ID Format and leave the Name ID as Basic Information > Primary email.
-
Click Continue.
-
Enter the following Attribute mapping:
Field Value Basic information Primary email App attributes email -
Click Finish.
-
To enable the app click OFF for everyone and change the setting to ON for everyone. Access can also be limited to groups or organizational units by selecting options on the left side of the screen.
-
Return to Add the metadata URL to your SAML configuration to continue the process.
Azure (Microsoft) SAML may also be referred to as Azure Active Directory (AD) or Microsoft Entra.
Create an Azure enterprise application
You will set up one application integration with a separate sign-on URL for each organization.
-
Log on to the Microsoft Entra admin center.
-
Navigate to Applications > Enterprise applications on the left.
-
Click New application on the top menu.
-
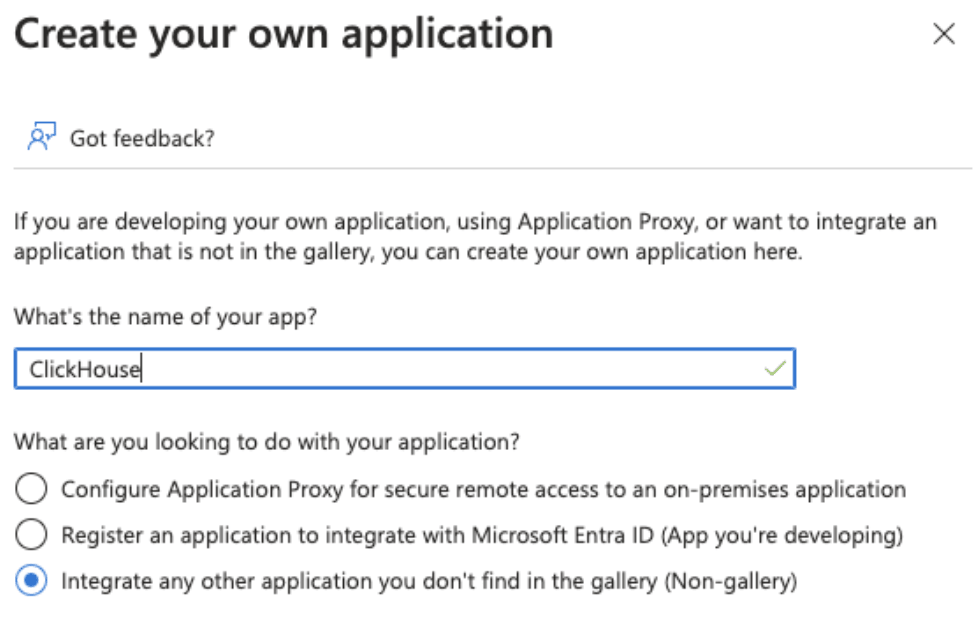
Click Create your own application on the top menu.
-
Enter a name and select Integrate any other application you don’t find in the gallery (Non-gallery), then click Create.
-
Click Users and groups on the left and assign users.
-
Click Single sign-on on the left.
-
Click SAML.
-
Use the following settings to populate the Basic SAML Configuration screen.
Field Value Identifier (Entity ID) Copy the Service Provider Entity ID from the console Reply URL (Assertion Consumer Service URL) Copy the Single Sign-On URL from the console Sign on URL https://console.clickhouse.cloud/?connection={organizationid}Relay State Blank Logout URL Blank -
Add (A) or update (U) the following under Attributes & Claims:
Claim name Format Source attribute (U) Unique User Identifier (Name ID) Email address user.mail (A) email Basic user.mail (U) /identity/claims/name Omitted user.mail 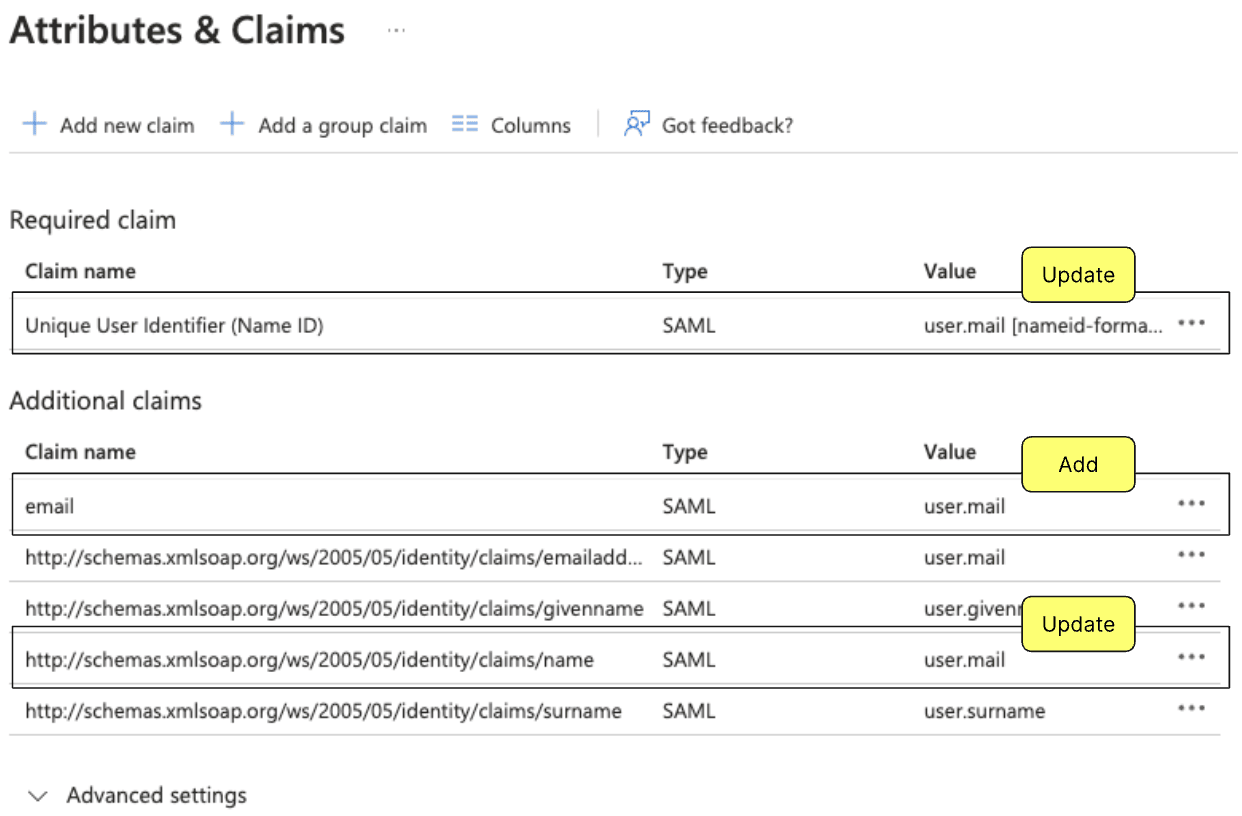
-
Copy the metadata URL and return to Add the metadata URL to your SAML configuration to continue the process.
Create a generic SAML service provider for Duo
-
Follow the instructions for Duo Single Sign-On for Generic SAML Service Providers.
-
Use the following Bridge Attribute mapping:
Bridge Attribute ClickHouse Attribute Email Address email -
Use the following values to update your Cloud Application in Duo:
Field Value Entity ID Copy the Service Provider Entity ID from the console Assertion Consumer Service (ACS) URL Copy the Single Sign-On URL from the console Service Provider Login URL https://console.clickhouse.cloud/?connection={organizationid} -
Copy the metadata URL and return to Add the metadata URL to your SAML configuration to continue the process.
Troubleshooting
There could be a misconfiguration in the system or a service outage
Cause: identity-provider-initiated login, which isn’t supported.
Fix: use the direct link https://console.clickhouse.cloud/?connection={organizationid}. Follow the instructions for your identity provider above to make this the default login method for your users.
You're directed to your identity provider, then back to the login page
Cause: the identity provider doesn’t have the email attribute mapping.
Fix: follow the instructions for your identity provider above to configure the user email attribute, then log in again.
User isn't assigned to this application
Cause: the user hasn’t been assigned to the ClickHouse application in the identity provider.
Fix: assign the user to the application in the identity provider and log in again.
You always land in the same organization with multiple SAML orgs
Cause: you’re still logged in to the first organization.
Fix: log out, then log in to the other organization.
The URL briefly shows access denied
Cause: your email domain doesn’t match the domain configured.
Fix: reach out to support for assistance resolving this error.
Frequently asked questions
Does ClickHouse Cloud support identity-provider-initiated sign-in?
No — only service-provider-initiated flows. Users navigate to https://console.clickhouse.cloud and enter their email to be redirected to your identity provider. Set up a bookmark or direct link (https://console.clickhouse.cloud/?connection={organizationid}) so users don’t have to remember the URL.
How do I use SAML SSO with multiple organizations?
ClickHouse Cloud supports multi-organization SSO with a separate connection per organization.
Your first login to each organization must use its direct link (https://console.clickhouse.cloud/?connection={organizationId}). This first login provisions your account in that organization. If your organization has SCIM enabled, you can skip this step because your account will already be provisioned.
For subsequent sign-ins, log in to any of your SAML organizations. Your other SAML organizations are available in the organization switcher in the console sidebar, and selecting one signs you into that organization through its SSO.
If you don’t want users on your domain routed to an organization automatically when they enter their email at https://console.clickhouse.cloud, open a support ticket to remove that behavior.
Why do I see multiple accounts for the same user?
ClickHouse Cloud doesn’t automatically link SSO and non-SSO accounts, so a user who has signed in both ways may appear more than once in your user list even with the same email address.
Next steps
- Manage cloud users — manage permissions and restrict access to SAML connections only.
- SCIM provisioning — automate user and group provisioning with Okta or Microsoft Entra ID.
- Console roles and permissions — the roles you can assign as the default SAML role.